翻譯進度
60.8% 已翻譯
更新時間:
2024年6月30日 上午8:27:00 [世界標準時間]
翻譯人員:
幫我們翻譯此頁

Laravel Telescope

簡介

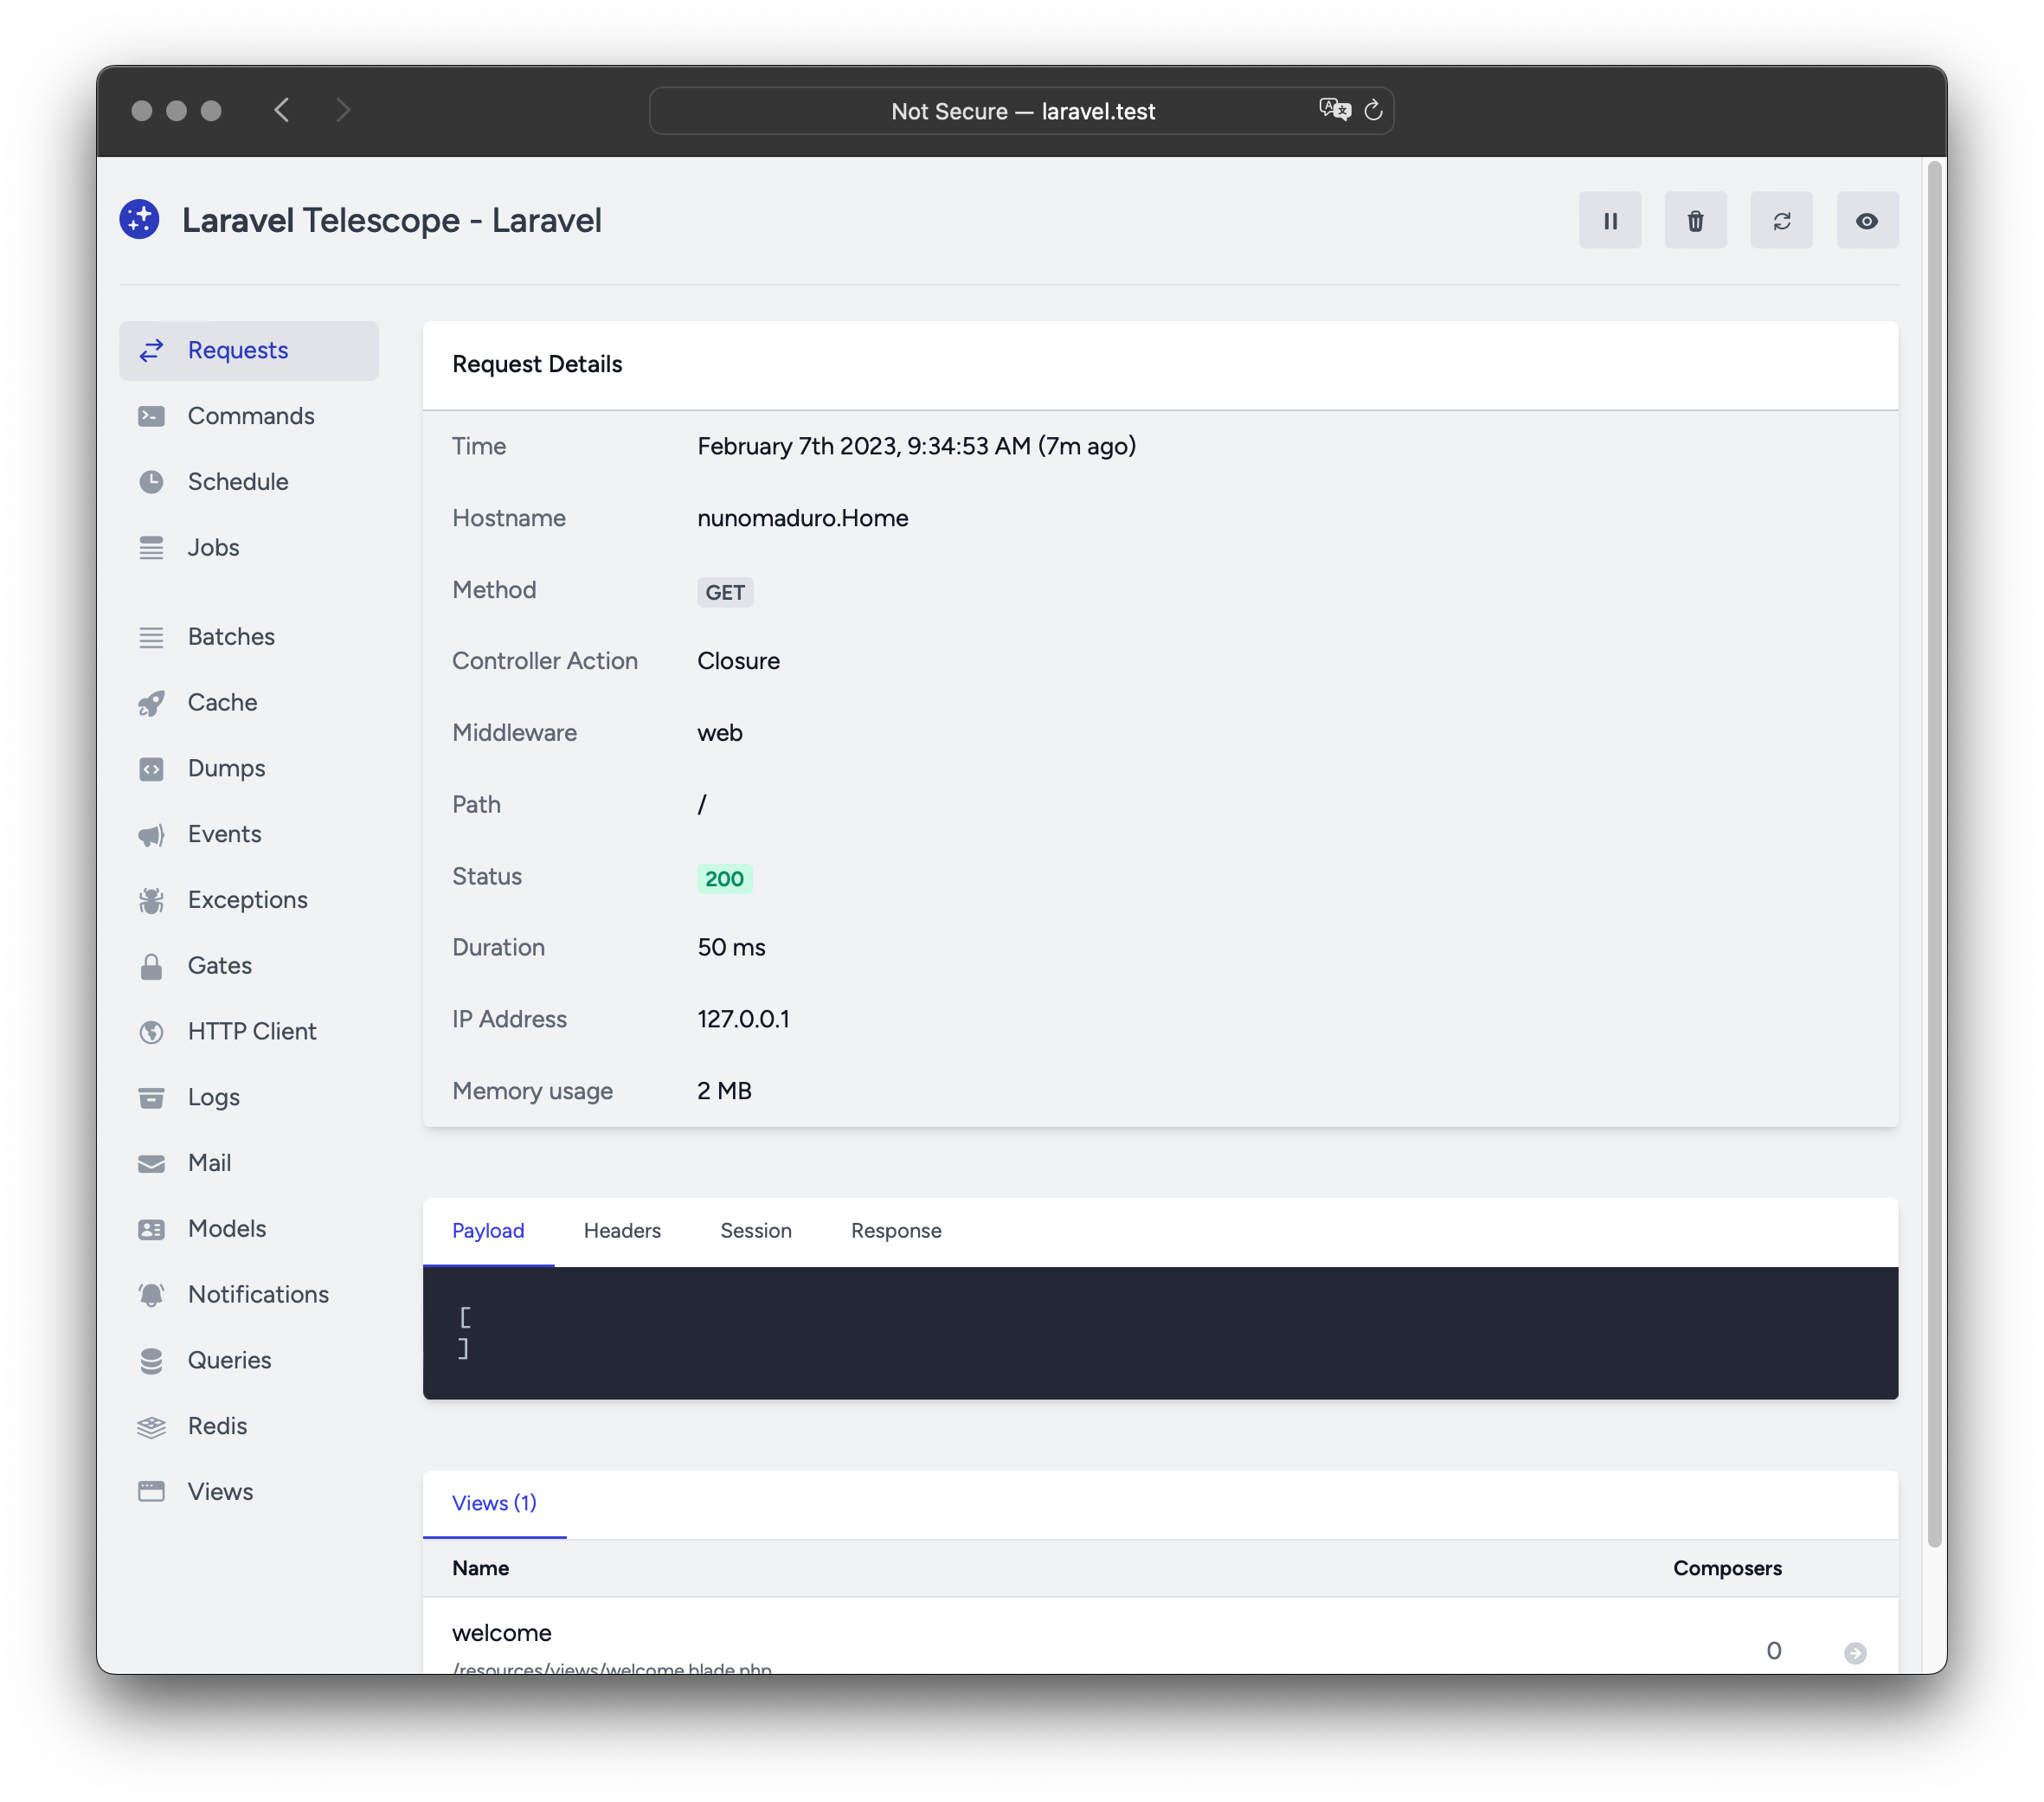
Laravel Telescope 是 Laravel 本機開發環境的好夥伴。在 Telescope 中,可以檢視連入 Request、Exception、Log 項目、資料庫查詢、放入佇列的 Job、Mail、Cache 操作、排程任務、變數傾印⋯⋯等。
安裝

可以使用 Composer 套件管理員來將 Telescope 安裝到 Laravel 專案中:

1composer require laravel/telescope

After installing Telescope, publish its assets and migrations using the telescope:install Artisan command. After installing Telescope, you should also run the migrate command in order to create the tables needed to store Telescope's data:

1php artisan telescope:install
2 
3php artisan migrate
1php artisan telescope:install
2 
3php artisan migrate

Finally, you may access the Telescope dashboard via the /telescope route.

只在本機上安裝

若只打算使用 Telescope 來協助在本機上開發,可使用 --dev 旗標來安裝 Telescope:

1composer require laravel/telescope --dev
2 
3php artisan telescope:install
4 
5php artisan migrate
1composer require laravel/telescope --dev
2 
3php artisan telescope:install
4 
5php artisan migrate

After running telescope:install, you should remove the TelescopeServiceProvider service provider registration from your application's bootstrap/providers.php configuration file. Instead, manually register Telescope's service providers in the register method of your App\Providers\AppServiceProvider class. We will ensure the current environment is local before registering the providers:

1/**
2 * Register any application services.
3 */
4public function register(): void
5{
6 if ($this->app->environment('local')) {
7 $this->app->register(\Laravel\Telescope\TelescopeServiceProvider::class);
8 $this->app->register(TelescopeServiceProvider::class);
9 }
10}
1/**
2 * Register any application services.
3 */
4public function register(): void
5{
6 if ($this->app->environment('local')) {
7 $this->app->register(\Laravel\Telescope\TelescopeServiceProvider::class);
8 $this->app->register(TelescopeServiceProvider::class);
9 }
10}

最後,也請在 composer.json 檔中加上下列內容來防止 Telescope 套件被 Auto-Discover

1"extra": {
2 "laravel": {
3 "dont-discover": [
4 "laravel/telescope"
5 ]
6 }
7},
1"extra": {
2 "laravel": {
3 "dont-discover": [
4 "laravel/telescope"
5 ]
6 }
7},

設定

安裝好 Telescope 的素材後,主要設定檔會被放到 config/telescope.php。在這個設定檔中,我們可以設定 Watcher 選項。每個設定選項都包含了有關該選項功能的說明,因此建議先仔細看過這個設定檔。

若有需要,可以使用 enabled 設定選項來完全禁用 Telescope 的資料蒐集:

1'enabled' => env('TELESCOPE_ENABLED', true),

資料修剪

若未修建(Prune)批次,則 telescope_entries 資料表很快就會變得很大。為了避免這個狀況,應定期每日執行 telescope:prune Artisan 指令:

1use Illuminate\Support\Facades\Schedule;
2 
3Schedule::command('telescope:prune')->daily();
1use Illuminate\Support\Facades\Schedule;
2 
3Schedule::command('telescope:prune')->daily();

預設情況下,所有超過 24 小時的資料都會被修建掉。可以在呼叫該指令時使用 hours 選項來指定 Telescope 的資料要被保留多久。舉例來說,下列指令會刪除建立超過 48 小時的所有資料:

1use Illuminate\Support\Facades\Schedule;
2 
3Schedule::command('telescope:prune --hours=48')->daily();
1use Illuminate\Support\Facades\Schedule;
2 
3Schedule::command('telescope:prune --hours=48')->daily();

主控台的權限控制

The Telescope dashboard may be accessed via the /telescope route. By default, you will only be able to access this dashboard in the local environment. Within your app/Providers/TelescopeServiceProvider.php file, there is an authorization gate definition. This authorization gate controls access to Telescope in non-local environments. You are free to modify this gate as needed to restrict access to your Telescope installation:

1use App\Models\User;
2 
3/**
4 * Register the Telescope gate.
5 *
6 * This gate determines who can access Telescope in non-local environments.
7 */
8protected function gate(): void
9{
10 Gate::define('viewTelescope', function (User $user) {
11 return in_array($user->email, [
13 ]);
14 });
15}
1use App\Models\User;
2 
3/**
4 * Register the Telescope gate.
5 *
6 * This gate determines who can access Telescope in non-local environments.
7 */
8protected function gate(): void
9{
10 Gate::define('viewTelescope', function (User $user) {
11 return in_array($user->email, [
13 ]);
14 });
15}
lightbulb

請確定有在正式環境中將 APP_ENV 環境變數設為 production。否則會讓任何人都能存取 Telescope。

升級 Telescope

將 Telescope 升級到新的主要 (Major) 版本時,請務必仔細閱讀升級指南

此外,升級到任何新的 Telescope 版本時,請重新安裝 Telescope 的素材:

1php artisan telescope:publish

為了確保素材在最新版本並避免在未來的更新中造成問題,可以將 vendor:publish --tag=laravel-assets 指令加到 composer.json 檔中的 post-update-cmd Script 中:

1{
2 "scripts": {
3 "post-update-cmd": [
4 "@php artisan vendor:publish --tag=laravel-assets --ansi --force"
5 ]
6 }
7}
1{
2 "scripts": {
3 "post-update-cmd": [
4 "@php artisan vendor:publish --tag=laravel-assets --ansi --force"
5 ]
6 }
7}

篩選

Entry

可以使用 App\Providers\TelescopeServiceProvider 類別中定義的 filter 閉包來篩選 Telescope 紀錄的資料。預設情況下,這個閉包會紀錄 local 環境下的所有資料,或是 其他任何環境下的 Exceoption、失敗的 Job、排程任務、以及包含監控中 Tag 的資料:

1use Laravel\Telescope\IncomingEntry;
2use Laravel\Telescope\Telescope;
3 
4/**
5 * Register any application services.
6 */
7public function register(): void
8{
9 $this->hideSensitiveRequestDetails();
10 
11 Telescope::filter(function (IncomingEntry $entry) {
12 if ($this->app->environment('local')) {
13 return true;
14 }
15 
16 return $entry->isReportableException() ||
17 $entry->isFailedJob() ||
18 $entry->isScheduledTask() ||
19 $entry->isSlowQuery() ||
20 $entry->hasMonitoredTag();
21 });
22}

Batch

filter 閉包會篩選個別資料項目,而 filterBatch 方法則可註冊一個用來篩選特定 Request 或主控台指令中所有資料的閉包。若該閉包回傳 true,則 Telescope 就會紀錄所有資料:

1use Illuminate\Support\Collection;
2use Laravel\Telescope\IncomingEntry;
3use Laravel\Telescope\Telescope;
4 
5/**
6 * Register any application services.
7 */
8public function register(): void
9{
10 $this->hideSensitiveRequestDetails();
11 
12 Telescope::filterBatch(function (Collection $entries) {
13 if ($this->app->environment('local')) {
14 return true;
15 }
16 
17 return $entries->contains(function (IncomingEntry $entry) {
18 return $entry->isReportableException() ||
19 $entry->isFailedJob() ||
20 $entry->isScheduledTask() ||
21 $entry->isSlowQuery() ||
22 $entry->hasMonitoredTag();
23 });
24 });
25}

Tag

在 Telescope 中,可以使用「Tag」 來搜尋項目。通常來說,Tag 會是 Eloquent Model 的類別名稱,或是已登入使用者的 ID。這兩種情況 Telescope 會自動為其加上 Tag。但有時候,我們會想在一些項目上加上自訂的 Tag。這時,可以使用 Telescope::tag 方法。tag 方法的參數為一個閉包,該閉包回傳一組 Tag 陣列。這個閉包所回傳的 Tag 會被與 Telescope 自動加入的 Tag 合併。一般來說,應在 App\Providers\TelescopeServiceProvider 類別的 register 方法內呼叫 tag 方法:

1use Laravel\Telescope\IncomingEntry;
2use Laravel\Telescope\Telescope;
3 
4/**
5 * Register any application services.
6 */
7public function register(): void
8{
9 $this->hideSensitiveRequestDetails();
10 
11 Telescope::tag(function (IncomingEntry $entry) {
12 return $entry->type === 'request'
13 ? ['status:'.$entry->content['response_status']]
14 : [];
15 });
16 }

可用的 Watcher

Telescope 的「Watcher」負責在 Request 或主控台指令被執行時取得專案中的資料。可以在 config/telescope.php 設定檔中自訂要啟用的 Watcher 清單:

1'watchers' => [
2 Watchers\CacheWatcher::class => true,
3 Watchers\CommandWatcher::class => true,
4 ...
5],
1'watchers' => [
2 Watchers\CacheWatcher::class => true,
3 Watchers\CommandWatcher::class => true,
4 ...
5],

有的 Watcher 也支援一些客製化選項:

1'watchers' => [
2 Watchers\QueryWatcher::class => [
3 'enabled' => env('TELESCOPE_QUERY_WATCHER', true),
4 'slow' => 100,
5 ],
6 ...
7],
1'watchers' => [
2 Watchers\QueryWatcher::class => [
3 'enabled' => env('TELESCOPE_QUERY_WATCHER', true),
4 'slow' => 100,
5 ],
6 ...
7],

Batch Watcher

Batch Watcher 會紀錄有關放入佇列的 Batch 資料,其中包含 Job 與連線的資訊。

Cache Watcher

Cache Watcher 會在 Cache 索引鍵被取得 (Hit)、找不到 (Missed)、更新 (Update)、刪除 (Forgotten) 時紀錄資料。

Command Watcher

Command Watcher 會在 Artisan 指令執行時紀錄指令的引數、選項、終止代碼 (Exit Code)、與輸出。若想排除掉某些指令不被此 Watcher 紀錄,可以在 config/telescope.php 檔中的 ignore 選項內指定這些要排除的指令:

1'watchers' => [
2 Watchers\CommandWatcher::class => [
3 'enabled' => env('TELESCOPE_COMMAND_WATCHER', true),
4 'ignore' => ['key:generate'],
5 ],
6 ...
7],
1'watchers' => [
2 Watchers\CommandWatcher::class => [
3 'enabled' => env('TELESCOPE_COMMAND_WATCHER', true),
4 'ignore' => ['key:generate'],
5 ],
6 ...
7],

Dump Watcher

Dump Watcher 會將變數傾印紀錄並顯示在 Telescope 內。在使用 Laravel 時,可以使用全域的 dump 函式來傾印變數。若要紀錄傾印,必須在瀏覽器中打開 Dump Watcher 分頁。若未開啟頁面,則 Dump Watcher 會忽略該傾印。

Event Watcher

Event Watcher 會紀錄專案所分派的任何 EventPayload(承載)、Listener、與 Broadcast 資料。Event Watcher 會忽略 Laravel 框架內部的 Event。

Exception Watcher

Exception Watcher 會紀錄專案回擲的任何可回報 (Reportable) 之 Exception 的資料與堆疊追蹤 (Stack Trace)。

Gate Watcher

Gate Watcher 會紀錄專案中所有 Gate 與 Policy 檢查的資料與結果。若想排除特定的 Ability 被此 Watcher 紀錄,可在 config/telescope.php 檔中的 ignore_abilities 選項內指定要排除的 Ability:

1'watchers' => [
2 Watchers\GateWatcher::class => [
3 'enabled' => env('TELESCOPE_GATE_WATCHER', true),
4 'ignore_abilities' => ['viewNova'],
5 ],
6 ...
7],
1'watchers' => [
2 Watchers\GateWatcher::class => [
3 'enabled' => env('TELESCOPE_GATE_WATCHER', true),
4 'ignore_abilities' => ['viewNova'],
5 ],
6 ...
7],

HTTP Client Watcher

HTTP Client Watcher 會紀錄專案中所執行的聯外 HTTP Client Request 紀錄。

Job Watcher

Job Watcher 會紀錄專案中分派的所有 Job 的資料與狀態。

Log Watcher

Log Watcher 會紀錄專案所寫入的任何 Log 資料

預設情況下,Telescope 只會紀錄 error 層級或更高層級的 Log。不過,我們可以在 config/telescope.php 設定檔中修改 level 選項來更改此行為:

1'watchers' => [
2 Watchers\LogWatcher::class => [
3 'enabled' => env('TELESCOPE_LOG_WATCHER', true),
4 'level' => 'debug',
5 ],
6 
7 // ...
8],
1'watchers' => [
2 Watchers\LogWatcher::class => [
3 'enabled' => env('TELESCOPE_LOG_WATCHER', true),
4 'level' => 'debug',
5 ],
6 
7 // ...
8],

Mail Watcher

在 Mail Watcher 中,可以在瀏覽器內預覽專案所送出的 E-Mail,以及其相關的資料。這些 E-Mail 也可以被下載為 .eml 檔。

Model Watcher

Model Watcher 會在每次有 Eloquent Model Event 被分派時紀錄 Model 的更改。可以在此 Watcher 的 events 選項中指定要紀錄哪些 Model Event:

1'watchers' => [
2 Watchers\ModelWatcher::class => [
3 'enabled' => env('TELESCOPE_MODEL_WATCHER', true),
4 'events' => ['eloquent.created*', 'eloquent.updated*'],
5 ],
6 ...
7],
1'watchers' => [
2 Watchers\ModelWatcher::class => [
3 'enabled' => env('TELESCOPE_MODEL_WATCHER', true),
4 'events' => ['eloquent.created*', 'eloquent.updated*'],
5 ],
6 ...
7],

若想紀錄某個特定 Request 中有多少的 Model 被重新回填 (Hydrate),可以啟用 hydrations 選項:

1'watchers' => [
2 Watchers\ModelWatcher::class => [
3 'enabled' => env('TELESCOPE_MODEL_WATCHER', true),
4 'events' => ['eloquent.created*', 'eloquent.updated*'],
5 'hydrations' => true,
6 ],
7 ...
8],
1'watchers' => [
2 Watchers\ModelWatcher::class => [
3 'enabled' => env('TELESCOPE_MODEL_WATCHER', true),
4 'events' => ['eloquent.created*', 'eloquent.updated*'],
5 'hydrations' => true,
6 ],
7 ...
8],

Notification Watcher

Notification Watcher 會紀錄專案中寄出的所有 Notification。若 Notification 有觸發 E-Mail,且啟用的 Mail Watcher,則也可以在 Mail Watcher 畫面中預覽該 E-Mail。

Query Watcher

Query Watcher 會紀錄專案中執行的所有查詢之原始 SQL、繫結、與執行時間。Query Watcher 也會在所有執行時間大於 100 毫秒的查詢上加入 slow Tag。可以使用此 Watcher 的 slow 選項來自訂慢查詢的界定值:

1'watchers' => [
2 Watchers\QueryWatcher::class => [
3 'enabled' => env('TELESCOPE_QUERY_WATCHER', true),
4 'slow' => 50,
5 ],
6 ...
7],
1'watchers' => [
2 Watchers\QueryWatcher::class => [
3 'enabled' => env('TELESCOPE_QUERY_WATCHER', true),
4 'slow' => 50,
5 ],
6 ...
7],

Redis Watcher

Redis Watcher 會紀錄專案中執行的所有 Redis 指令。若使用 Redis 來進行快取,則快取指令也會被 Redis Watcher 紀錄。

Request Watcher

Request Watcher 會紀錄專案所處理的所有 Request 之 Header、Session、以及該 Request 所關聯的 Response 資料。可以使用 size_limit (單位為 KB) 選項來限制要紀錄的 Response 資料:

1'watchers' => [
2 Watchers\RequestWatcher::class => [
3 'enabled' => env('TELESCOPE_REQUEST_WATCHER', true),
4 'size_limit' => env('TELESCOPE_RESPONSE_SIZE_LIMIT', 64),
5 ],
6 ...
7],
1'watchers' => [
2 Watchers\RequestWatcher::class => [
3 'enabled' => env('TELESCOPE_REQUEST_WATCHER', true),
4 'size_limit' => env('TELESCOPE_RESPONSE_SIZE_LIMIT', 64),
5 ],
6 ...
7],

Schedule Watcher

Schedule Watcher 會紀錄專案所執行的所有排程任務的指令與輸出。

View Watcher

View Watcher 會在轉譯 View 時紀錄 View 的名稱、路徑、資料、與所使用的「Composer」。

顯示使用者的顯示圖片

Telescope 主控台會顯示資料在紀錄時已登入使用者的顯示圖片。預設情況下,Telescope 會使用 Gravatar 服務來取得顯示圖片。不過,也可以在 App\Providers\TelescopeServiceProvider 類別中註冊一個回呼來自訂顯示圖片的網址。該回呼會收到使用者的 ID 與其 E-Mail 位址,並且應會穿該使用者的顯示圖片網址:

1use App\Models\User;
2use Laravel\Telescope\Telescope;
3 
4/**
5 * Register any application services.
6 */
7public function register(): void
8{
9 // ...
10 
11 Telescope::avatar(function (string $id, string $email) {
12 return '/avatars/'.User::find($id)->avatar_path;
13 });
14}
1use App\Models\User;
2use Laravel\Telescope\Telescope;
3 
4/**
5 * Register any application services.
6 */
7public function register(): void
8{
9 // ...
10 
11 Telescope::avatar(function (string $id, string $email) {
12 return '/avatars/'.User::find($id)->avatar_path;
13 });
14}
翻譯進度
60.8% 已翻譯
更新時間:
2024年6月30日 上午8:27:00 [世界標準時間]
翻譯人員:
幫我們翻譯此頁

留言

尚無留言

“Laravel” is a Trademark of Taylor Otwell.
The source documentation is released under MIT license. See laravel/docs on GitHub for details.
The translated documentations are released under MIT license. See cornch/laravel-docs-l10n on GitHub for details.